
Shopify has become a viral sensation with lots of new options and features ever since its creation in 2006, which started off by selling snowboarding equipment online for the first time. Today, Shopify has evolved to become an all-in-one eCommerce solution as a cloud-based eCommerce web-building platform that contributes to over $700 billion in total sales.
Even the most recognized brands like Netflix’s online shop, Red Bull, and Heinz Co. are running their online stores on Shopify now. So, do you want to know how you can become a part of a 5 million online business on Shopify? Then this guide is for you.
In this article, we have written a step-by-step guide for beginners on how to start a Shopify store from scratch. We will also share the legal and compliance requirements to get your business the official recognition it deserves.
How to Start a Shopify Store in 2026: 12 Easy Steps

“Everything seems impossible until it’s done” is a famous proverb that you may have heard by now. If 5 million businesses have changed their way of handling eCommerce, then why can’t you? If you have a business idea that you can take online to make some sales, then here are the 12 steps to bring your online store to life.
Step #1: How to Create an Account on Shopify
Go to Shopify’s website and click on the ‘Start Free Trial’ button in the upper right corner of the screen. After selecting the Start Free Trial Button, you will find a series of questions with ready-made answers. It’s totally up to you to either skip them or choose an answer that matches your business’s preferences and needs.

In the Start Free Trial, you have to enter an email, set a password, and choose a unique store name. After doing so, you will be directed to the Admin Panel. Here, you are ready to set up your Shopify Store and begin your 4-day free trial.
Step #2: Understanding the Admin Panel
Once you have availed your free trial on Shopify, you will find the following features on the admin panel:
- Orders: This option allows you to manage and view your complete list of orders received from Shopify, which includes order fulfillment, cancellation, and reviews.
- Products: In the Products section, you can add, edit, and manage your inventory of product listings, which include images, descriptions, and price settings.
- Customers: Here you will find the list of registered customers, their contact information, and their username details that they have provided to place an order via your Shopify store.
- Content: In this section, you can manage your content, such as blogs, landing page content, and more. This is the point where you can perform on-page SEO to improve your website’s visibility to engage a larger audience.
- Finances: Manage all your financial analytics and details in your Shopify store’s Finance option, which includes revenue, expenses, and profits. Here you can monitor the financial health of your business.
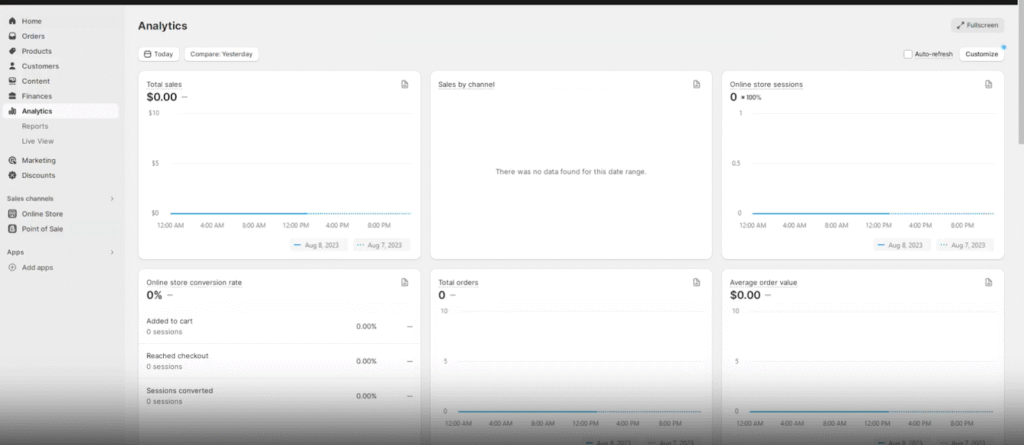
- Analytics: The analytics view provides you with complete details of the number of sales, revenue generated, and performance of a product over the time period, which provides an overview of your store’s overall performance.
- Marketing: Now you can configure multichannel promotions via Shopify’s email marketing, Facebook ads, social media posts, and SMS marketing. Here you can set up automated marketing with abandoned cart emails.
- Discounts: Want to give your customers a real treat? The Discounts option lets you create discount codes and sets of terms and conditions, such as order amounts or discounts on certain products.
- Apps: With the Apps feature, you can extend your Shopify’s functionalities further by installing and managing other applications. For this, you can search for Apps in categories such as store design, conversion, fulfillment, customer service, and more.
Step #3: How to Choose Your Theme on Shopify
After opening a Shopify account, the platform has already set up a default theme for the admin that can be found on the Themes page. If you want to choose a different theme for your Shopify store, you can add one by clicking the admin panel on the Online Store button and selecting Themes from the dropdown menu.
After reaching the Themes menu, scroll down to the section where it says ‘Popular free themes’ to find the top free themes that are available on the Shopify Theme Store. The second way to choose a theme is by clicking on ‘Visit theme store’ to explore the full catalog of available themes.
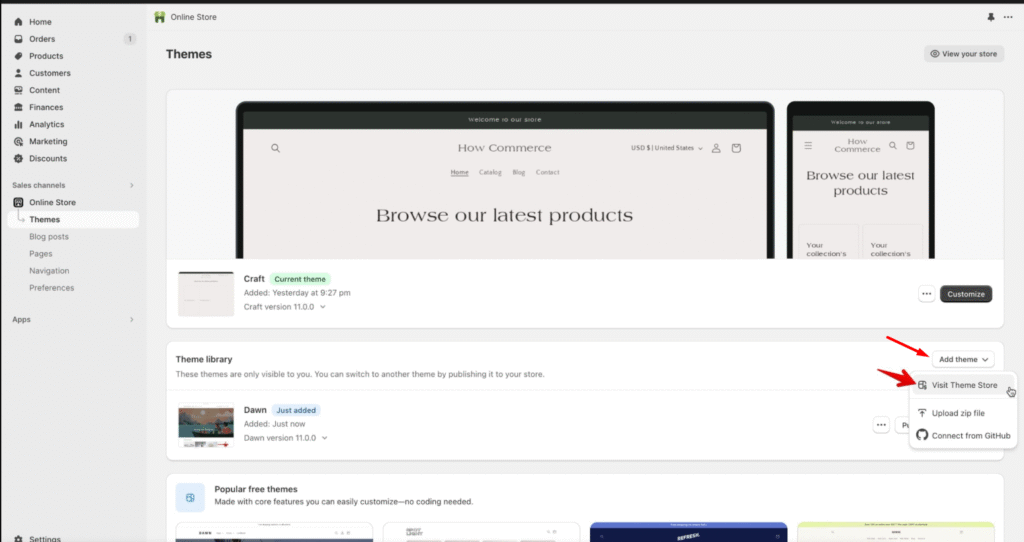
Once you have found a theme that you think is suitable for your website, click the ‘Add’ button next to it. By doing so, the chosen theme will be added to your Theme Library, which can be found on the Themes page of your admin.
To get a preview of how the selected theme will appear on your Shopify store’s front-end, select the three dots featured on the Theme library block and select the ‘Preview’ button. By doing so, you will get the exact view of how your Shopify store will appear to the customers or users with the selected theme.
Step #4: How to Add Navigation to Your Theme on Shopify
Want to make your Shopify store more interactive? Try adding navigation by going to Online store > Navigation section from the admin panel of your Shopify store. To change the footer menu of your Shopify Store, click on the ‘Footer menu’ and then select ‘Add menu items’. By doing so, a side action bar will appear where you can assign names to your chosen items and input links.
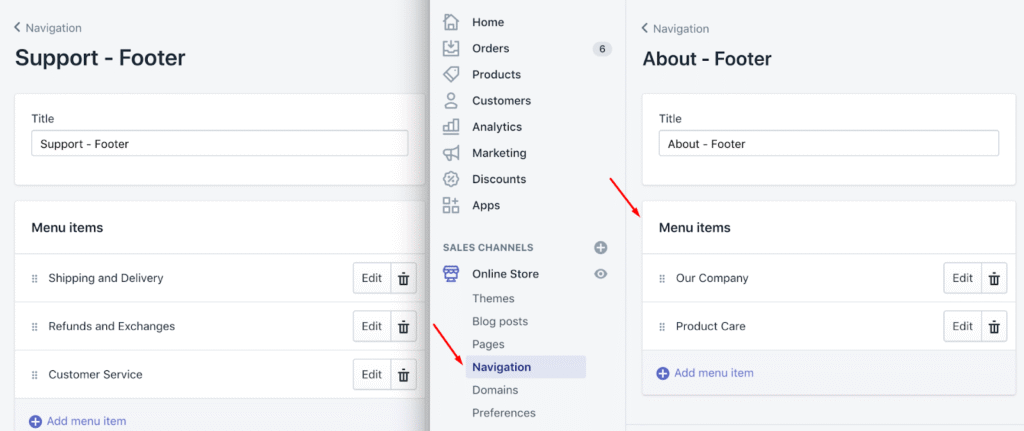
With Shopify, you can also make nested menus (a menu within a menu) for your Shopify store. Here, you can group the products, pages, or create addition drop-down menus.
Step #5: How to Add Products & Content Related to Them on Shopify
This step is the real deal where you set up your online shop to sell items or products. To add and organize your products or the content related to these products on your Shopify store, follow these steps:
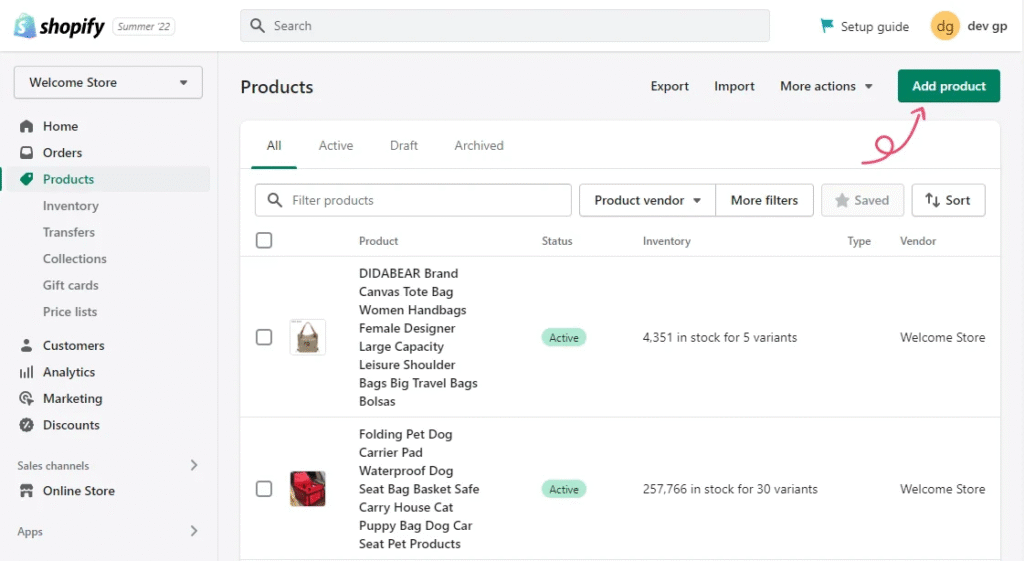
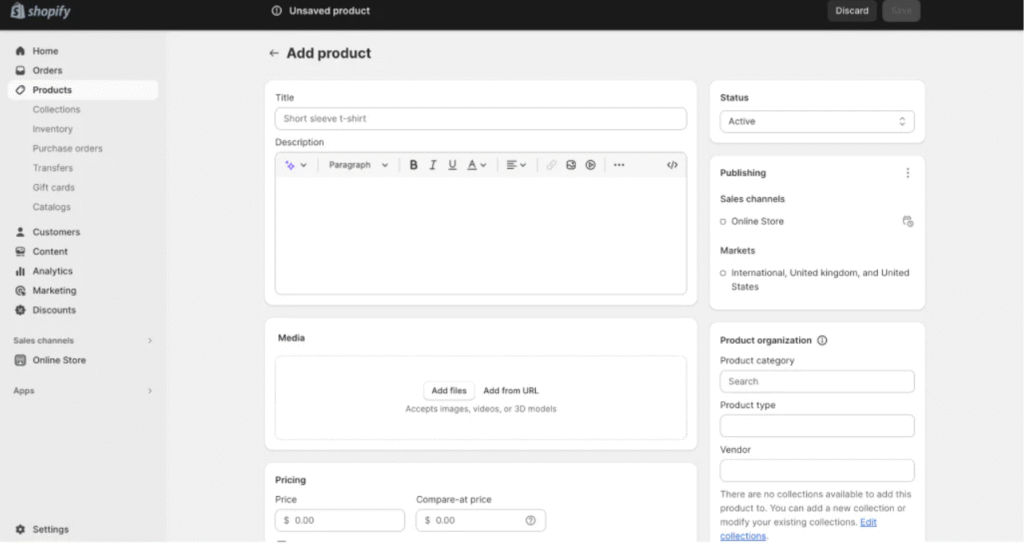
How to Add a New Product on Shopify
- Go to Products
- Click ‘Add product’
- Enter details about the title of your product and provide additional details related to that product.
- Finally, click ‘Save’ to apply changes.
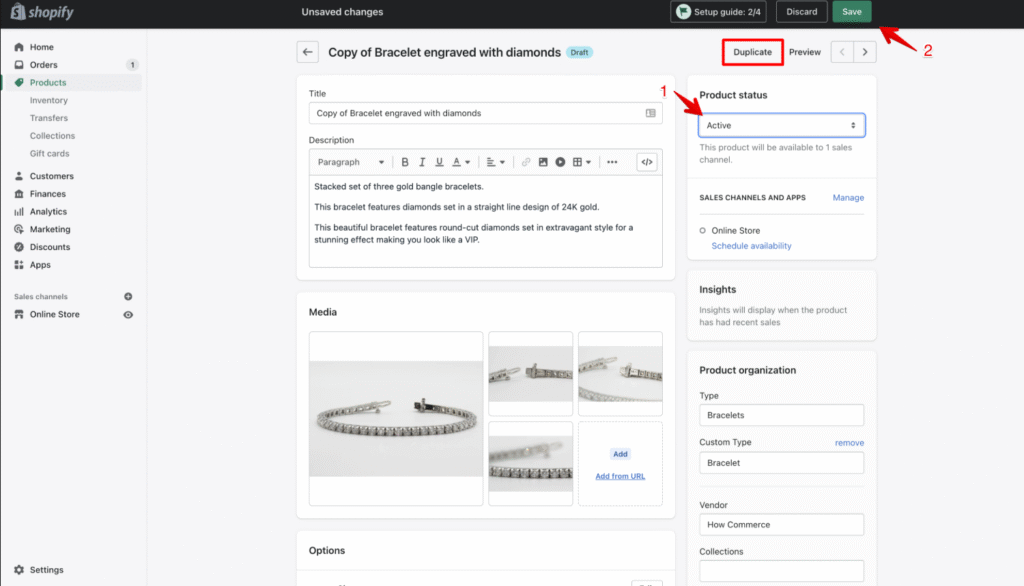
How to Duplicate a Product on Shopify
- Go to Products
- Click the name of the product you wish to duplicate
- Click ‘Duplicate’
- Enter a name for that duplicate product and select ‘Duplicate product’
- You can also change the product details as required
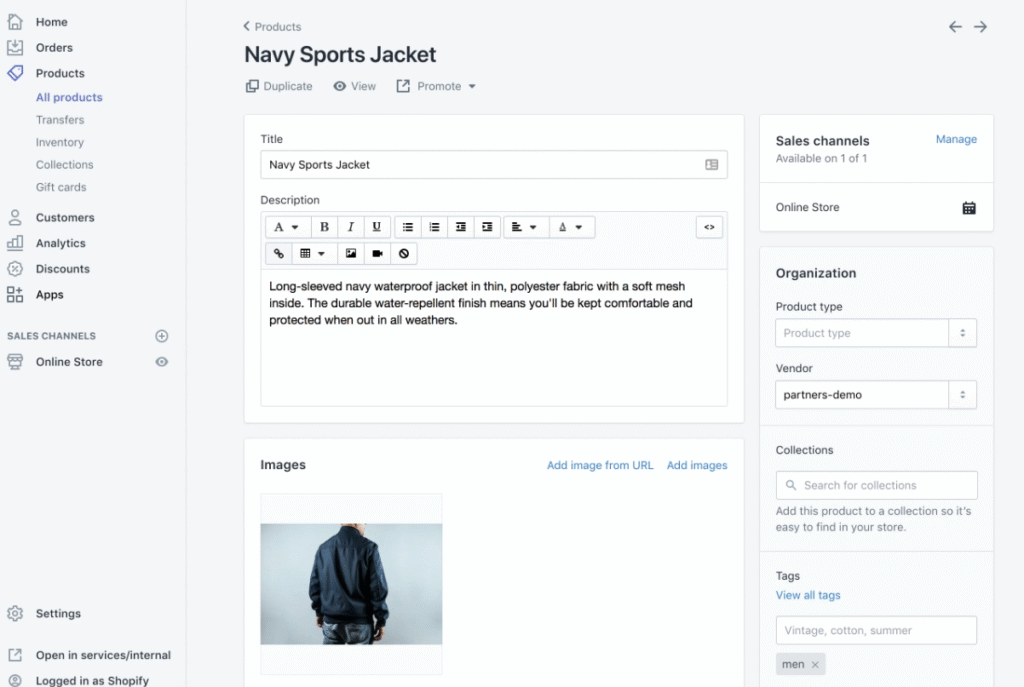
How to Edit a Product
- Go to the Product option
- Select the name of the product that you wish to edit
- Change the details of that product
- Click Save to apply changes
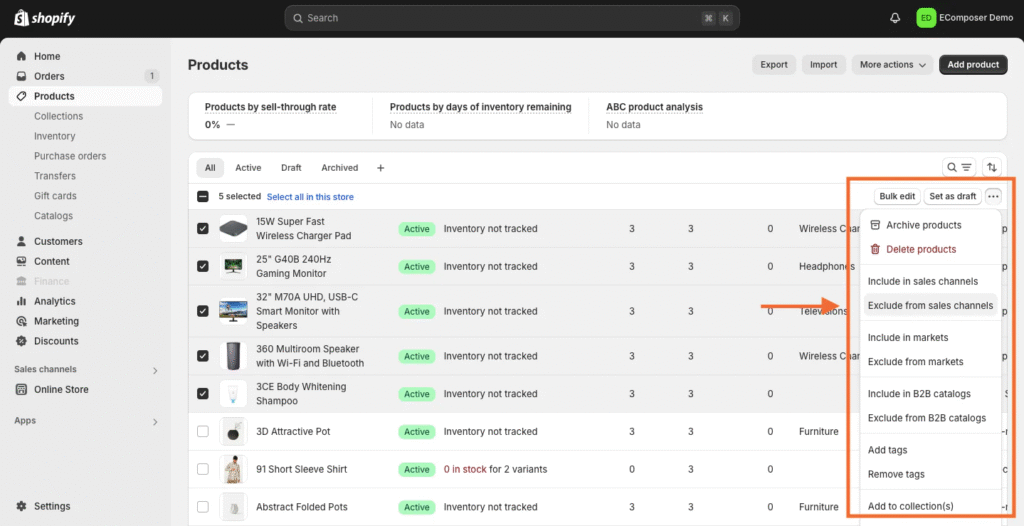
How to Include and Exclude Products from Your Channels
- Go to the Products menu
- Select the product’s name to open the list
- Go to Manage > Manage sales channels
- Select the sales channels or apps where you wish to include the product
- Click ‘Done’ and then ‘Save’ to apply changes
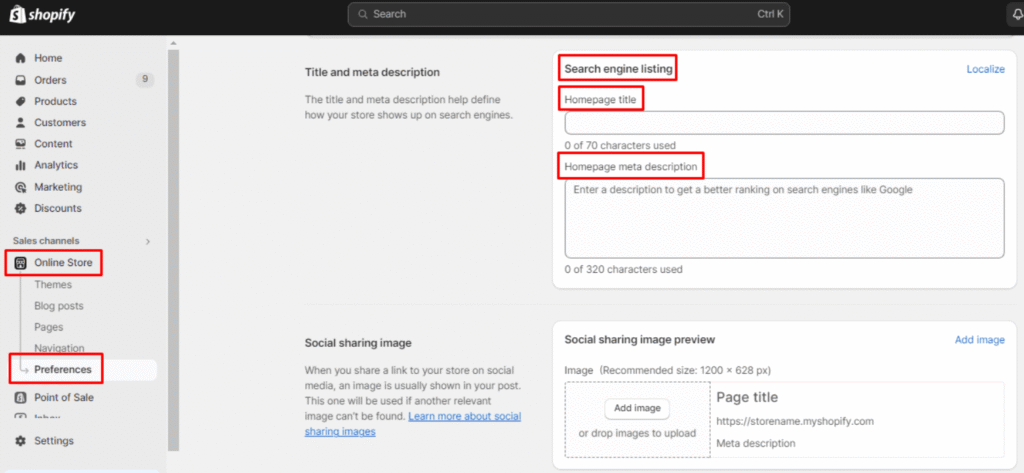
How to Edit a Search Engine Listing Preview
- Go to Products
- Choose the name of the Product you wish to edit
- In the Search Engine listing preview section, select ‘Edit Website SEO’
- Here, you can provide a description and a page title for the search engine listing
- Click ‘Save’ to apply changes
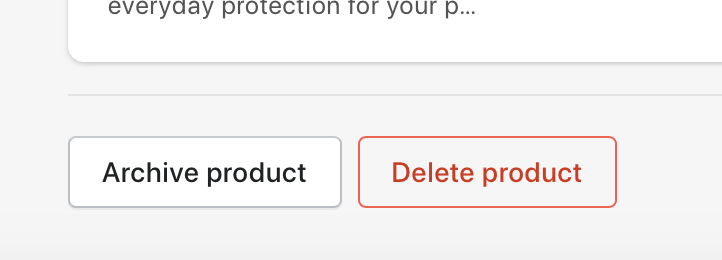
How to Archive a Product
- Go to the Products option
- Select the products you wish to archive
- Click ‘Archive Product’ on the product details page
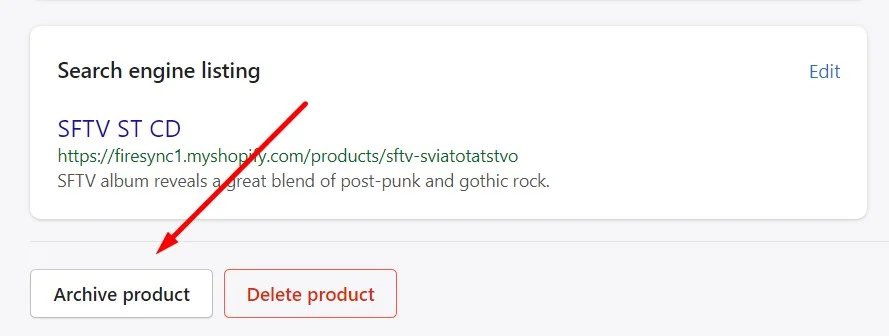
How to Delete a Product
- From the admin panel of your Shopify Store, go to the Products option
- Select the product you wish to delete
- Click ‘Delete Product’ on the product details page
Step #6: How to Set Up Payment Method on Shopify
Setting up the payment method is the most crucial step, as this is the point where you get to collect the revenue. Here is a step-by-step guide that can help you set up Shopify payments:
1. Check eligibility: Before doing any payment setup, make sure to check the eligibility of your Shopify store’s payment based on your location. Here is the list of supported countries and regions.
2. Apply Two-Step Authentication: To keep things secure, make sure the two-step authentication (2FA) is enabled on your Shopify account. By enabling this option, you can add an extra layer of security to protect your account and revenue-related information.
3. Activate Shopify payments: Let’s start getting paid by activating the Payments on Shopify. Go to Settings > Payments. Click Activate Shopify Payments in the Shopify Payments box. Confirm your choice by selecting the dialog box. Selecting any other credit card payment provider will remove it from your account.

4. Provide Business and Baking Details: This is the point where you have to double-check all the information you provide to ensure that it is accurate and complete.
5. Set up core currency: Select the currency you want to set for the pricing of your products, which will also appear in the generated reports. Make sure to set up the right currency before making your first sale.
6. Complete Account Setup: Based on your business type of location of the business, you may have to provide additional information such as Business Number, EIN, Taxpayer Identification Number (TIN), or any personal details applicable as per the region’s conditions.
7. Provide VAT Number (for European Region Only): If you are planning to open a Shopify store based in the European region, then it’s necessary to provide Value-Added Tax (VAT) number or select that you don’t have one. Shopify can verify VAT numbers via the VAT Information Exchange System.
8. Submit Verification Documents: In this step, you have to provide identity and home address confirmation. Make sure to upload a clear picture of these documents, with a valid one that is readable.
9. Wait for Documents Review: Once you have uploaded the documents, they will be reviewed to verify that everything matches with information provided on the Shopify payment account. While this process is ongoing, your payouts could remain on hold while the rest of the Shopify store remains operational.
10. Settings Configuration: Once you have completed the Shopify payment set up, you can further configure payment settings based on your preference. To test the setup, you can also perform a dummy transaction to ensure everything is working properly.
11. Support: In case you encounter any sorts of issues, errors, or hurdles, you can reach out Shopify Store for better guidance.
Keep in mind that the process to set up or verify the payment method can vary depending on the updates of the Shopify platform or the defined regulations. Therefore, always review the official Shopify documentation for accurate and up-to-date instructions. Also, don’t forget to set up the checkout page, as it is an integral part of the payment process.
How to Set Up the Checkout Page on a Shopify Store
1. Add Checkout Button: Click ‘Settings’ and choose ‘Checkout’ option from the dropdown menu on the ‘Settings’ page.
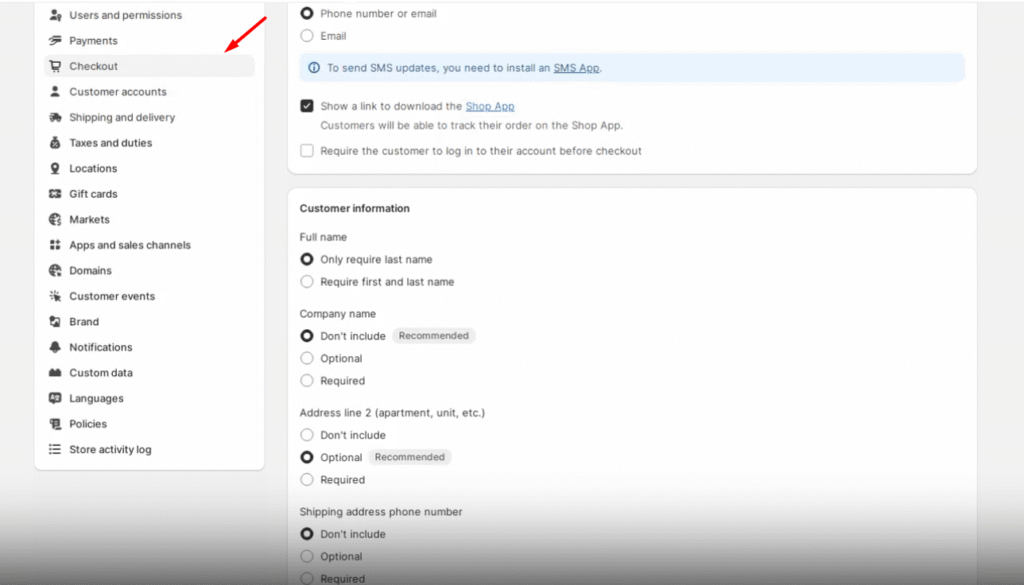
2. Configure Settings for Checkout: Configuration of settings in the checkout menu allows you to add various options and settings such as Checkout language and style, Customer accounts and preferences, Shipping and delivery options, Taxes and currency.
Step #7: How to Create Your Online Store Page
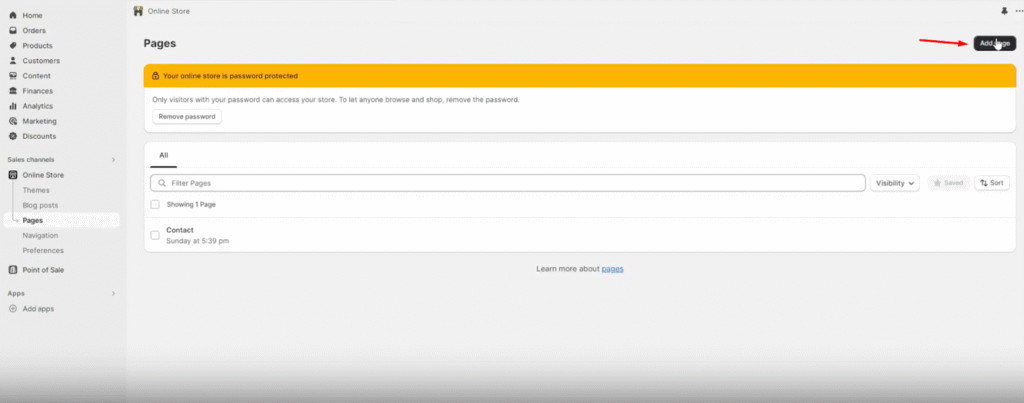
Since you are running an online store, there have to be multiple pages for various menus. To add pages to your Shopify Store, go to Online Store > Pages. This is the step where you can add a new page by clicking the ‘Add Page’ button.
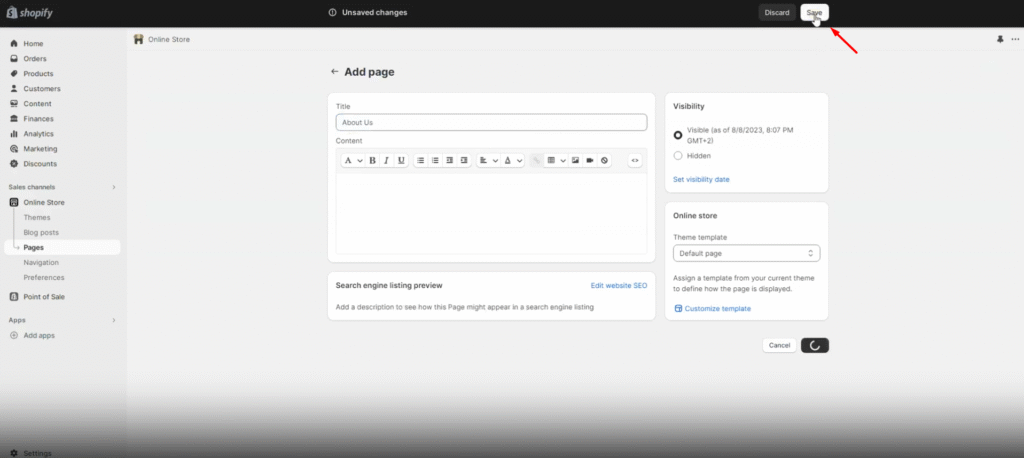
Provide the title and content for that newly added page. It’s better to be descriptive and clear with your title as it will appear in the search engine results and browser tabs. You can use the Rich Text Editor to format your content with links, tables, videos, and images. Here is what you have to do next:
- Setting Visibility: The visibility section helps you choose when the page should be published. New webpages are visible when you save them. For scheduling, you can also set the date of publishing or choose to hide the page.
- Saving the Page: Once you have defined the new webpage, click the ‘Save’ button to create the new webpage.
- Adding a link for the navigation menu: To make these new webpages accessible through the Shopify store’s navigation menu, you have to link them to it. Simply edit your store’s settings in the navigation menu to do so.
- Edit a webpage: If you want to make changes to your existing web page, go to the ‘Pages’ section and then select the title of the page that you wish to edit. After making changes to that page, click ‘Save’ to apply changes.
Step #8: How to Set Up Shipping Rates
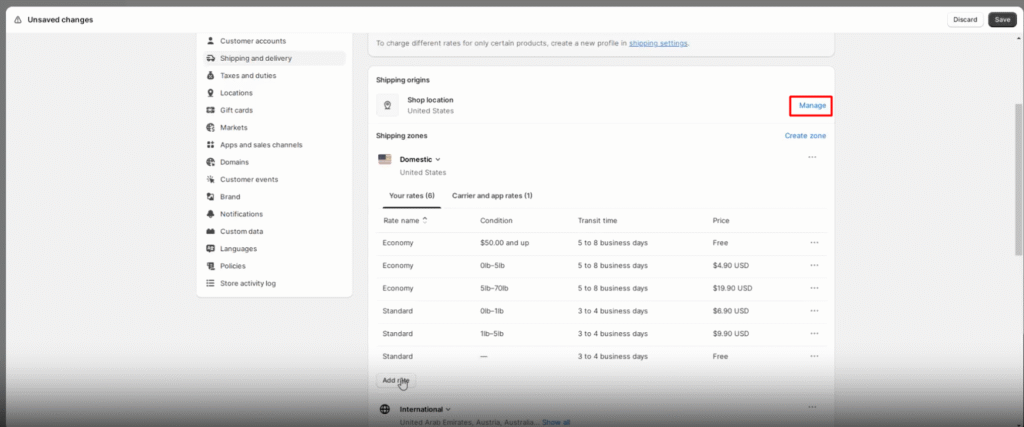
Shipping rates are something that you shouldn’t miss when it comes to placing orders and calculating your expenditures. To set these shipping rates on your orders, go to Settings > Shipping and delivery. Now choose the shipping profile you want to use and then click ‘Manage’.
Then follow these steps:
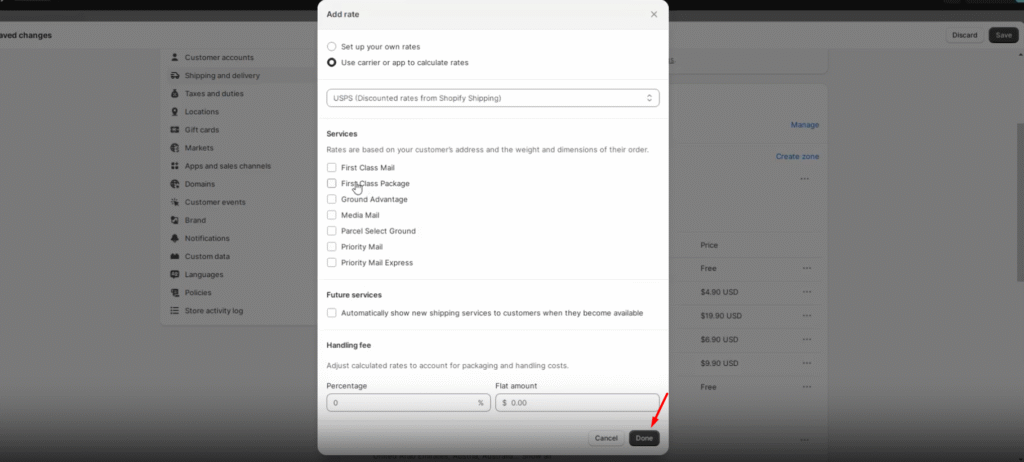
1. Add Shipping Rate: Select ‘Add rate’ and add the rate details. You can also enter the name of that added rate along with the applicable shipping rate value, including amount, currency, weight, etc.
2. Add Conditions (optional): The conditions are not must to apply, but you can add them to rates based on weight, price, or qualification for shipping.
3. Adjustment to Calculated Rates (optional): While adding the rates, you can add markup or discounted rates to modify what the customer sees at the checkout screen.
4. Saving Defined Rate: After finalizing the shipping rate, click ‘Done’ and then click ‘Save’ to apply changes.
5. How to Set Up Local Currency Shipping Rates for Shopify Payments only: For those stores that are using Shopify payments, you can apply the flat shipping rates in local currencies that go across all sorts of customers from different markets.
After defining your shipping rates, always remember to keep them updated regularly and also review them as needed to check any other competitive options for customers.
Step #9: How to Set Up Tax Rates
Running your online business also comes with a range of applicable taxes that apply to every purchase or to the business in general. Before setting up the tax rules on your Shopify store, you have to decide whether you should charge taxes on your store’s products. The best way is to involve a tax lawyer or a professional entity that can provide you with the right guidance for the tax regulations.
After consulting with the right authorities, make sure to register and obtain your tax number. For charging taxes on your products, consult with the relevant authorities in your region to get the tax number. Once you have overcome the legal issues, follow these next steps:
1. Access Tax Settings: Open your Shopify Store admin panel and then go to Settings > Taxes to select ‘Duties’.
2. Choose your region or country: Go to the ‘Manage sales tax collection’ section, then select your country or region.
3. How to Collect Sales Tax: Click the ‘Collect Sales Tax’ option to set up your tax collection based on the country or region of your choice.
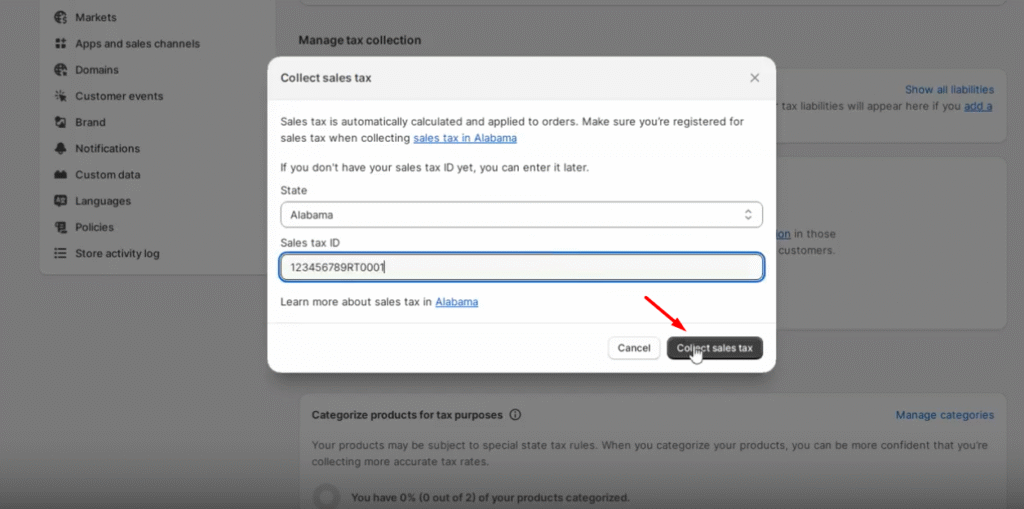
4. Enter Tax Number: Go to the ‘Tax Number’ field and enter your tax number. If you have not received your tax number yet, then you can update it later by leaving the text field empty.
5. Confirming Tax Collection: Then, you have to select ‘Collect Tax’ to confirm tax collection for the selected region.
6. Add multiple regions (optional): If you want to set up taxes for multiple/additional regions or account numbers, go to ‘Collect sales tax’ again and add more regions.
7. Managing Tax Settings: Once you have set up the tax regulations for one region, you can easily manage the other tax settings, which include overriding taxes, exemptions, or tax collection. This fact allows you to decide that you are charging the right tax amount, no matter which region you make sales in.
Step #10: How to Connect Your Domain with Shopify
You may have defined a name or domain for your Shopify store, and this is where you have to connect the Shopify store. To connect your domain with Shopify, simply follow these steps:
1. Navigate to the Shopify Admin Panel, and then go to Settings > Domains.
2. Select ‘Buy new domain’ or you can select ‘Connect an existing one’ to attach a pre-purchased domain.
3. If you want to connect an existing domain, provide the domain name with the complete URL and then click ‘Next’.

4. Select ‘Connect automatically’ and then click ‘Close’ to save changes.
5. Now you have to wait for up to 48 hours so that your domain can be verified by Shopify. Once the domain has been verified, it will appear in the ‘third-party domains’ section of the Domains page with the status appearing ‘Connected’.
Step #11: How to Test Your Shopify Store
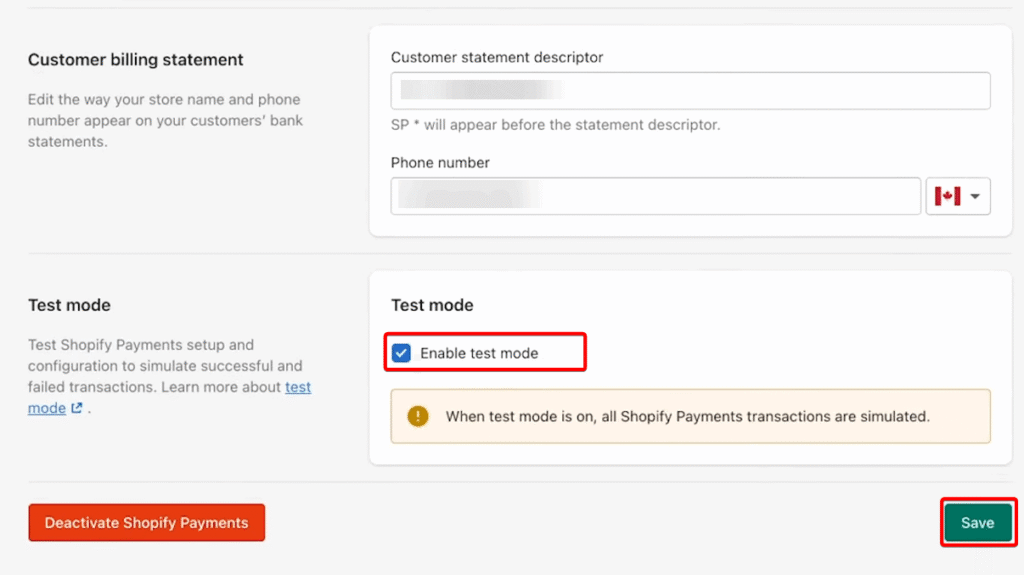
Before officially launching your Shopify store, it’s better to place a test order to see if everything is working as expected. To do this, go to your Shopify store’s admin panel. Navigate to Settings > Payments and then click ‘Edit’. Here, you will find a checkbox ‘Use test mode’ or ‘enable test mode’ which you have to select and then click ‘Save’.
Then you have to simulate a transaction case by following these steps:
- Go to your online store as a customer.
- Add a new product to your cart.
- Complete the checkout process by adding some necessary details.
For testing an order process, you don’t have to enter all the real details. Instead, you can add the following details:
- Name on card: Enter at least two words.
- Expiry date: Enter any future date.
- CVV: Enter any three digits
- Card number: Use one of the following test card numbers based on the card type:
- Visa: 4242424242424242
- Mastercard: 5555555555554444
- American Express: 378282246310005
- Discover: 6011111111111117
- Diners Club: 30569309025904
- JCB: 3530111333300000
This process will simulate a test transaction, and you can check the order panel and other notifications to see if everything is working as expected.
Step #12: Final Step to Launch Your Shopify Store
Finally, when you have set up and tested everything, it’s time to launch your Shopify store for all public users online. To make the store accessible for everyone, you’ll have to remove the store password restriction by following these steps:
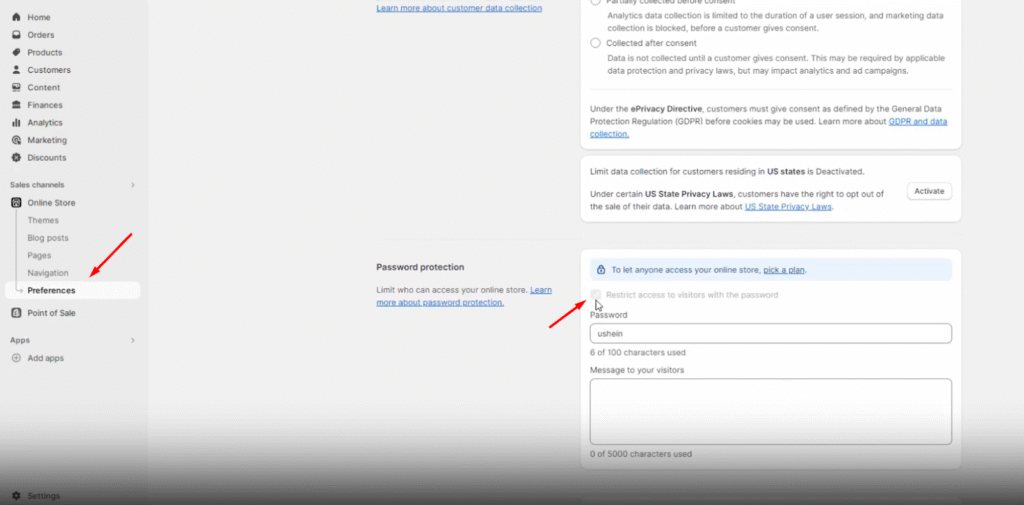
- Go to the Shopify Admin panel and navigate to Online Store > Preferences.
- Scroll down and find the ‘Password Protection’ section.
- Unmark the checkbox with the label ‘Restrict access to visitors with the password’.
- Click ‘Save’ to apply changes.
Once you have removed the password restriction, your Shopify store will go live officially and become accessible for the public via domain name, links, search engines, or any other source. Now you are ready to acquire customers and make sales via your store.
FAQs
How much does it cost to start a Shopify Store?
Shopify offers various payment options, which include the following charges:
- Basic: $32 per month, best for individuals and small businesses
- Shopify: $92 per month, best for small teams
- Advanced: $399 per month, best for medium to large businesses
- Shopify Plus: $2,000 per month ($2,500/month starting March 13, 2024), best for high-volume businesses
How much does Shopify charge on every sale of a product?
Basic Shopify Transaction fees:
- Domestic online transactions fee: 2.9% + 30¢
- Third-party transaction fees: 2.0% (not Shopify payment)
- Online international/Amex credit card rates: 3.5% + 30¢
- Currency conversion fee: 2.0%
Shopify Pricing Plan: Transaction fees:
- Domestic online transactions fee: 2.7% + 30¢
- Third-party transaction fees: 1.0%
- Online international/Amex credit card rates: 3.4% + 30¢
- Currency conversion fee: 2.0%
Advanced Shopify Transaction fees:
- Domestic online transactions fee: 2.4% + 30¢
- Third-party transaction fees: 0.5%
- Online international/Amex credit card rates: 3.3% + 30¢
- Currency conversion fee: 2.0%
How long does it take to set up your Shopify Store from start?
Including the setup process, payment method integrations, and document verification process, it can take up to 3 to 4 days to complete the basic elements of a Shopify Store with all the essential contents.
Read More: Can you sell CBD on Shopify?
Conclusion
Setting up a Shopify store gives you access to all the options and features you require to run an eCommerce store. Even those who don’t have much technical knowledge can run their own online business with Shopify by following the steps mentioned in this guide. So, what are you waiting for? Join the community of 5 million businesses and start your online store right from your garage or backyard without needing a physical location!
https://highstacksolutions.com/woocommerce-vs-shopify-which-platform-is-best-for-cannabis-store/